Thursday, February 28, 2019

Up to my elbows in triangles

Some of them are even sewn together!

As of Sunday, my design wall looked like this -


and as I continued piecing those triangle stars, I started sewing leftover triangles into strips for possible border use.


Things really started to perk up when I pulled this piece of fabric (bought on a whim last year) out of the stash and auditioned it for a stop border.


And one thing led to another, and I suddenly had my nine stars done!


Let's turn the corner on that test border, shall we?


But wait!  Will those triangles look better with the darker ones towards the outside edge?


The answer is "yep."

So here's where it currently stands.


I think I'm going to like it!

There have been a few inquiries about the pattern for these stars.  I spotted the original pattern in a back issue of a quilt magazine (hurray for Friends of the Library Book Sales!) a couple of years ago, and have been randomly cutting and binning triangles for it ever since.  The pattern is available on the All People Quilt website (now for a fee), but there's a smaller version of it still offered for free.  (The stars are the same size (finishing to about 18.5"), but the freebie pattern only calls for four, and the stars are much less scrappy)
Here's the link, for those who are interested - Batik Triangle Stars.
You're welcome!


Saturday, February 23, 2019

Of stars and sand castles

While I haven't managed to post much lately, I have managed to get a bit of sewing done.  Here's a peek at my design wall as of this morning.


You can see my Goosey Temps columns on the far left.  February is trying to catch up with January.  (I'm not going to tell Feb that no matter how hard it tries, it's always going to be shorter than Jan...)

With the addition of these two, I've now got enough yellow Sand Castles to make my heart happy.


And in between the geese and the strings, I've been chugging along with my triangle stars.  I sew triangles together into diamonds, then assemble two diamonds and a background triangle into these units.


Those get sewn together into half blocks,


and then the halves becomes wholes with the addition of corner squares.


Then one star becomes two stars,


and now I've got four completed stars and five more in various stages of finishedness.

My plan (at this moment) (and subject to change) (because I do that) (not that I'm a ditherer or anything) (decisive to the core, that's me) (uh huh) is to stop at nine stars and use leftover triangles to make a border around them.  It looks good in my head - we'll see how well that translates to fabric.
Because sometimes my plans work.  Really!

Linking with soscrappy for ScrapHappy Saturday and with Quilting is more fun than Housework for Oh Scrap!  Come see all the gorgeous scrappiness!

Saturday, February 9, 2019

Sand Castles and other fiddly bits

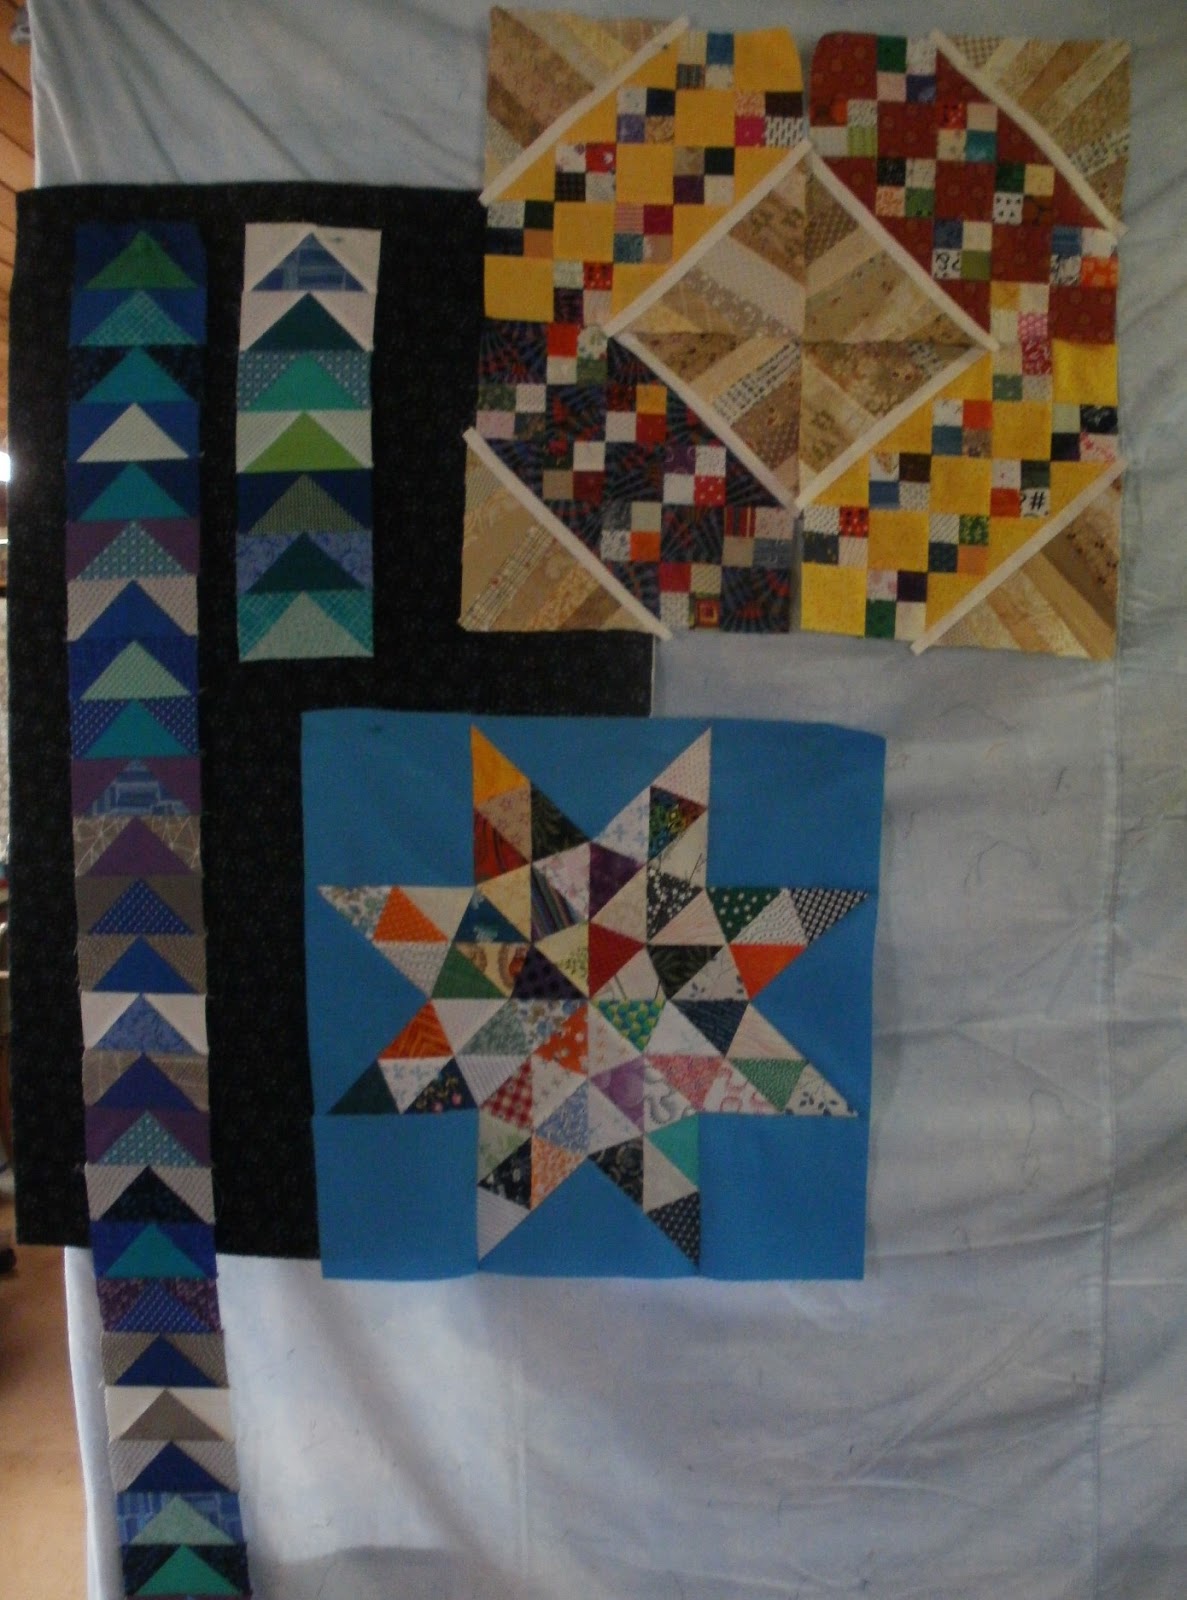
I'm totally in love with my Sand Castles blocks.  I got one yellow block stitched up for February's RSC -


and then another.


Taking a closer look at those two I had to admit they were rather boring similar, so I'm going to have another dig through my yellow scraps and see if I can come up with something a little bouncier.  In the meantime, I grabbed another red for last month,


and then did one in a multi-color with no dominant color, which would have been hard to squeeze into RSC format.


Up on the design wall they went!


You can my goosey temperature blocks on the left.  Here's a close-up of the first week in February.


It was a goofy week, since we went from -10 to 62 in a 48 hour period.  It's hard to know how to dress...

I'd hung up a piece of a black starry print as a possible sashing for my geese, but I'm having my doubts about it since the darker blues disappeared right into it. Picking a sashing color is going to be a problem, since I've pretty much got every color involved in my temp scale, including white and gray which could have been tapped for sashing if I'd thought ahead at all.  (note to self:  try to think ahead more often)
It did occur to me that I hadn't used pink (though I'm thinking of using hot pink to indicate temps over 100 degrees this summer)  (hopefully there won't be much call for it) (because yikes!), so I grabbed the nearest hunk of pink (more of a coral actually) and hung it up behind the geese.


Eh.  On the other hand, I don't actually have to make a decision on this for another 10+ months, so I've got lots of time to dither.  (It has occurred to me that I could use the colors that are going to represent the high temp as sashing for the low temp months, gradually swapping them for low temp colors used for sashing in high temp months.  Sounds complicated and grisly, so I'll be giving it more thought.)  (The easiest way out would be to just skip sashing altogether, and that option is still in play.)

And you might have noticed that one big block trying to sneak into all the pictures.  I've got one triangle star to show off.


I've spent scraps of time over the last year or so, cutting triangles and sticking them in a bin.  The blocks are a bit nit-picky to sew, but I do love my fiddly bits.  There's no plan and no hurry - I just am in love with this block so I'm going to sew some stars.  Sort of a slow-motion squirrel, you might say.


Linking with soscrappy for ScrapHappy Saturday and with Quilting is more fun than Housework for Oh Scrap!  Come see all the golden scrappy wonders!


Sunday, February 3, 2019

Star Patch is nearing the finish line

My oldest WIP is still chugging along, getting closer and closer to being done.  I've finished all the quilting (by hand, no less) except for the last two rows in the outer borders.  Since I think the lines of quilting will be easier to keep straight if I have a clear edge to work with, I've started applying the binding, then I'll go back and finish the quilting.

I've had this bright stripe set aside for a long time since it contains all the colors in this bright scrappy quilt.


When I started sewing the strips together, I had a moment's pause.  Should I drive myself crazy go to the trouble of matching the stripes?


I tested by folding the strip down to see how much that jog was going to show. 


The answer?  Not much.  And certainly not enough for me to fuss about at this point.
Carrying on, I stitched it in place,


and started the hand stitching.


There's a line of quilting 1/4" from the edge of that green border - the plan is to echo that with a line 1/4" from the binding, then run one more line right down the middle.  The end is in sight!

I've been working on this quilt, off and on, for about 15 years at this point.  It's going to feel really good to finish it!


Linking with Quilting is more fun than Housework for Oh Scrap!   Let's all celebrate the scrappy!


Saturday, February 2, 2019

Glad to see the end of January

If for no other reason than that my January strip for my temperature quilt was starting to get a little unwieldy.


Here's the last week of the month - the white triangles represent all those nights we had where the temps were below zero.


Now onward to February!  Every day puts us that much closer to spring!  (Can't wait to start working with greens and yellows!)

Another thing I finished in January was my Good Fortune top.  I've tucked it away for now, since I have several other projects queued up for quilting.  (Check out the last Good Fortune Linky Party here, to see all the lovely mystery quilts!)


I do love it truly, and it won't stay dormant long!

With a new month, we have a new color for the Rainbow Scrap Challenge - yellow for warmth and brightness at this chilly and drab time of year.
I cut some squares and triangles for Sand Castle blocks and laid out the first one.  (The next three yellows are stacked neatly at the bottom of the picture)


As I mentioned earlier, I'm cutting my string triangles from strips rather than making strippy squares and slashing them diagonally.


I've been cutting newsprint strips of the correct width and as long as my paper would allow, then cutting off my triangles as I go.  The only problem was when I got to the end of the strip and ended up with a rough HST.  It was possible to sew it on to the end of a new strip, then true up the next triangle, but it was a bit of a pain in the butt.  It would have been nice to just add on another strip with tape, but I was pretty sure that tape and a hot iron would make a pretty bad combination.

Oh, if only there were some way to easily attach one thing to another.

Oh, wait...


Doh.
I lined up my papers and stitched right through.  The pencil line was added after the stitching.
Like this:


Those aren't cutting lines, especially since they'll be buried under the fabric strips - they're just there to give me a heads up that seam lines are in the neighborhood and I might want to compensate with wider or narrower strips to keep the bulk under control.  I try to keep plenty of choices available!


Lumpy seam allowances are yucky, after all!


Linking with SoScrappy for ScrapHappy Saturday.  Come see all the golden delight!